
How it Works Overview

Choose a product to onboard the account with then choose your account level policies.

After setting up your simulation account, you can choose actions to occur at specific times from the Action Timeline.

Play an action to see what effects it has on the account.
Try the Walkthrough Demo
Accessing LoanLab
LoanLab is intended for simulating, experimenting, and testing, so it can be found in the CanopyOS menu of your UAT environment - you will not find LoanLab in your production environment.
Not sure what your UAT environment address url is?
Generally, it’s in the following format:
https://[your_company_name]-uat.us.canopyservicing.com/
If you’re still having trouble finding it, reach out to us at support@canopyservicing.com.

Create an Account
The first thing we need to do is configure our simulation account.
To do this, simply start by choosing the product you want to associate with the account.
You’ll then be presented with a number of account level inputs. We’ve defaulted these inputs for your convenience, but you may choose to fill in all or none of them.
All account level configuration inputs are optional; if not provided, they will default to the product level configuration.
Account Setup Inputs

Setup the Action Timeline
After account setup, you’ll be taken to a page that should look familiar to you - the CanopyOS account view- with one main difference, there will be an Action Timeline drawer open.
The Action Timeline is where you can setup what you want to happen over the course of the account’s lifecycle.
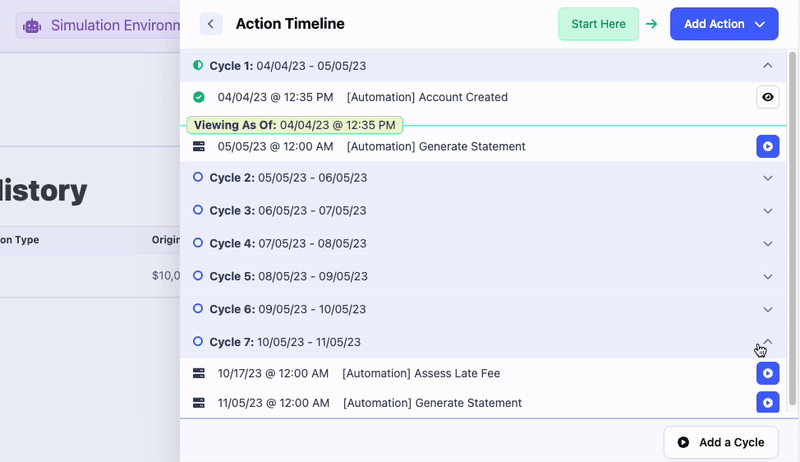
The Action Timeline will be pre-populated with Cycles and Automated Actions.
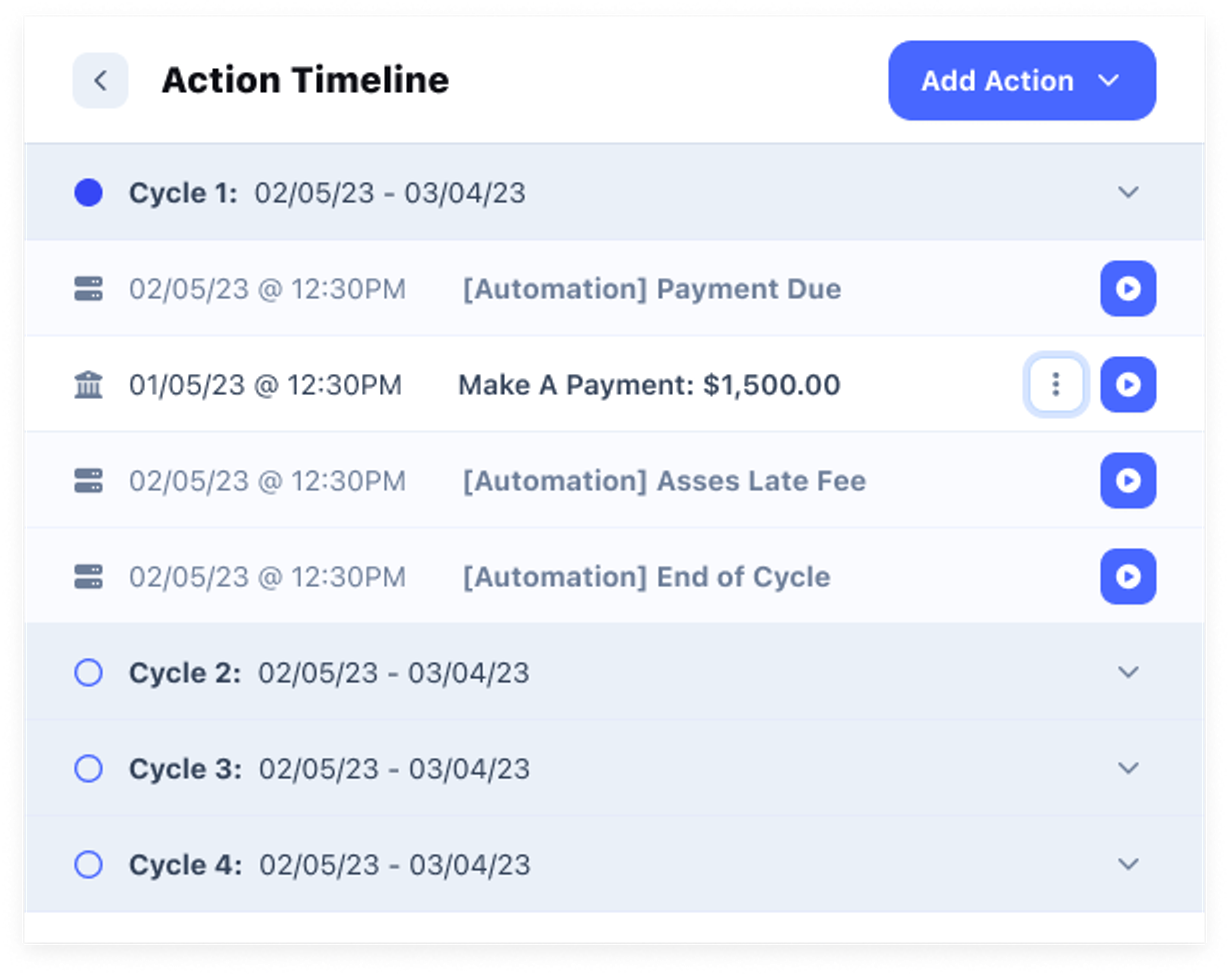
Cycles
The Action Timeline will be pre-populated with the account’s cycles based on the product selection and account policy inputs from step one.
Revolving Cycles
Because revolving products do not have a set term length, if you are using a Revolving product type, LoanLab will add 4 cycles by default.
You can add additional cycles at any time by clicking the “Add a Cycle” button from the Action Timeline footer.
Actions
Within LoanLab, Actions represent events that can occur on an account over its lifecycle.
Automated Actions
The Action Timeline is pre-populated with a few items labeled with [Automation].
These are actions that the system automatically takes based on your policies and configurations.
Automated Action Name | Description |
[Automation] Account Created | The date and time the account was configured to be effective. |
[Automation] Generate Statement | The exact point the cycle ends and the statement data is generated. |
[Automation] Assess Late Fee | The point in time Canopy’s system will assess whether or not a late fee needs to be applied to the account based on if the minimum payment due for that cycle was made in full on time.
Note: This is may not be the same time the payment is due if you have configured to allow for a late fee grace period. |
[Automation] AutoPay |
Adding Actions
You can add additional actions to the account’s lifecycle by clicking on Add Action from the Action Timeline.
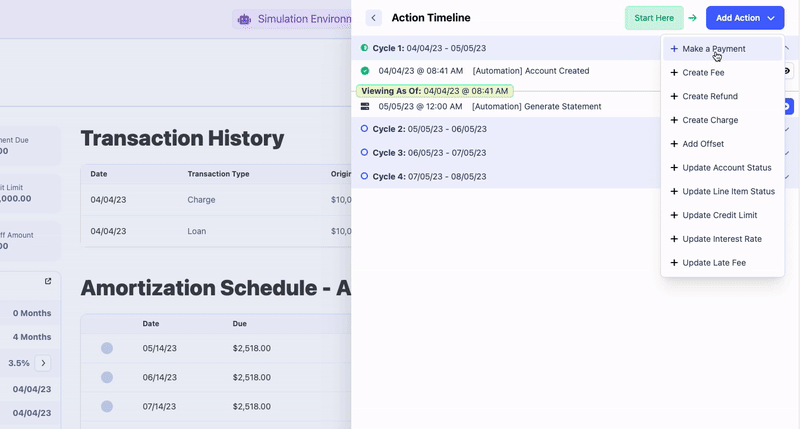
Add Action: Options
Action Name | Description |
Make a Payment
Line Items | |
Create Fee
Line Items | |
Create Refund
Line Items | |
Create Charge
Line Items | |
Create Offset
Line Items | The Create Offset action will allow you to select whether you want to add an offset that will increase or decrease the account balance.
Offsets can be applied to interest, principal, or fees.
Selecting Increase will create a credit offset.
🔗 Related API Endpoint →
Selecting Decrease will create a debit offset.
🔗 Related API Endpoint → |
Update Line Item Status
Line Items | Simulates updating the line item status of a particular line item that was previously added.
🔗 Related API Endpoint → |
Update Interest Rate
Accounts | |
Update Late Fee
Accounts | Simulates updating the late fee amount that will be applied to an account upon missed payment.
🔗 Related API Endpoint → |
Update Credit Limit
Accounts | |
Update Account Status
Accounts |
Something Missing Here?
Hoping to use an action or API endpoint not listed above?
Take a look at what’s on the roadmap or tell us about it here!
Navigating the Action Timeline
Play

Click on the Play button to apply an action to the account and move the account forward to that point in time.
Once an action has been played, you cannot modify the timeline prior to the action played, but you can add future actions.
Tip: Want to play multiple actions at once? Clicking play on an action further down the timeline will play all prior actions as well.
View

Use the View button to quickly go back and forth to view the state of the account as it was in a previous point in time.
Options

Edit or Delete Action
Click on the three dots next to an unplayed action to edit or delete them.
Viewing As Of

The green “Viewing As Of” indicates the current point in time to Account View is showing.

View the Account
To view the current state of your account from the last played action in your timeline, simply click outside of the Action Timeline at any point.
This screen is meant to replicate the CanopyOS account view as closely as possible, providing you with an accurate representation of what you can expect to see from an account going through a similar lifecycle in production.

Similar to the Action Timeline, you can find the Viewing As Of indicator in the top right-hand corner of the account view to let you know at which point in time the account is showing.